BioEra on Android
Table of Contents
Android options in BioEra Pro
on Windows
Create Android diagnostic
file
BioEra elements only for
Android
BioEra on Android can load and execute design files with .abd
extension. To create or edit .abd design file use BioEra Pro for Windows version 3.0 or
higher.
This manual here contains only information specific to the version of BioEra
for Android. More information about general use of BioEra can be found here.
1. Android version 4.0 (also known as Ice
Cream Sandwich or ICS) or later.
2. Communication:
· Bluetooth capability - to communicate with biofeedback devices with bluetooth.
· Full USB 2.0 port (or OTG) for biofeedback devices with FTDI USB chips or Arduino.
Optionally - it may be useful to have an SD card port. This is a requirement if a micro SD dongle is purchased.
Open a web browser on your Android device (make sure you have Internet
connection) and type this URL:
bioera.net/a
BioEra for Android supports currently the following devices:
· Pocket Neurobics devices with USB.
· PET – bluetooth EEG, EMG, ECG, GSR www.brainquiry.nl
· Nonin4100 – bluetooth (wireless) oximeter www.nonin.com
· Contec CMS50EW – bluetooth (wireless) oximeter, use code 7762 to pair on Android (no code is required on Windows).
· ModEEG - EEG openeeg.sourceforge.net (this works only with versions of ModEEG with bluetooth or USB-FTDI chip).
Here is information how a
vendor can request a support for a new device for BioEra.
Android design can be created, opened and edited using the Windows BioEra Pro version 3.0 or higher.
In order to create an android design, select “New Android Design” from
the System menu.
Android design is contained in a
file with .abd extension (as Android BioEra Design).
When you open an Android design file (.abd), you will see additional
options (comparing to a design file with .bpd extension):
1. Android main menu with options described below.
2. List of available elements (visible when a new element is being added) will contain only those that can run on Android.
Android menu options
Android development is a little more complex when it comes to running and
debugging the design on a device because Android system is not fully accessible
from the Windows operating system. The Android menu options described below are
therefore to simplify this process and also to allow setting properties which
are applicable only to Android system.
Settings used only on the desktop side. They are stored together with System
Settings.
The communication between desktop
BioEra and Android BioEra is done over the network.
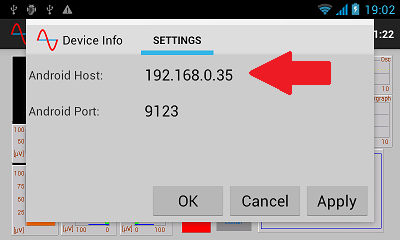
Important: The Device Host and Device Port
must be set in order to allow other menu options (described below) to work
properly. Those values can be found when you open BioEra on Android and select
menu Other Options and then Device Info.
On the example picture below the Host is set to 192.168.0.35 and the default port (usually you don’t need to change the port).
Use this option to upload current design to Android. After that the Android
design is loaded and started on the device.
Use this option to install files to the main BioEra folder (or subfolders) on
Android. All files must be stored in one zip file. Entire content of the
selected zip file is automatically extracted on Android. All existing files are
overwritten.
In order to delete files, add todelete.txt text file in the zip file (on the main level); each line must contain a path to a file which is to be deleted.
An example installation zip is here. It will install image_test.abd design and a picture it displays.
Remotely start the design loaded currently in BioEra on Android.
Remotely stop the design loaded currently in BioEra on Android.
This option can be used to create and download a diagnostic.zip file
from the BioEra on Android. That file contains diagnostic info, latest designs,
log files, configuration files and others (it could take some time to create if
there are many files). The diagnostic.zip file is saved in the main
BioEraPro folder on Windows.
This option can be used to help with debugging and testing of a design being
executed on the Android device. When it is activated, the Android log messages
are being printed on the local console immediately as they are created. (Note:
All logged messages can be also downloaded using the Diagnostic option
described above)
In order to start it do the following:
1. Make sure your connection settings are setup as described above.
1. Make sure that BioEra on the Android is opened.
2. Select the “Log Transfer” menu
option.
3. You should see the Android messages printed on your local console after that
(each line starts with ‘A:’);.
4. This option is active until BioEra Pro exits (it should persist when you
reload the Android design or restart BioEra on Android).
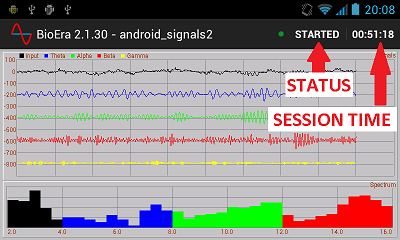
Toolbar buttons
There are two toolbar buttons available on every BioEra design (see the picture below)
· Status: for example STARTED, STOPPED or PAUSED. This button can be also used to start or to stop current design.
· Session time. This button can be also used to pause or resume current design.
Menu options:
· Load design – load a design which was installed on Android device.
· Switch screen – this option can be used to switch between Frames: Runtime1, Runtime2 and all charts which are placed on separate Frames.
· Exit – exit BioEra.
· Other options:
· Show device info – show a dialog with some information about the device
· Install files – install zip file in the main BioEra folder (can be used to install designs and resources)
· Design settings – normally it should not be needed, but it allows to change some design settings of the currently loaded design.
· Reload – reload current design
· Save – save currently loaded design
Some elements are available only for Android. They can be added only in a design for Android (.abd extension).
This element allows communicating with Arduino USB device using serial port API. Only one Arduino device can be communicated with. On Windows the same function can be accomplished using SerialPort element.
Requirement - the Android tablet/phone must have USB host ability (either a full USB 2.0 port or OTG). Most newer tablets and some phones can do this. Here is a list of some tablets which have been investigated.
It is also possible to communicate with Arduino over bluetooth (if it has
bluetooth shield). In such case the SerialPort element should be used.
This element is very similar to the version available on Windows.
There are however differences:
1. There is no support for impl folder as on Windows. An external element has to be put in a jar file (or apk) and installed in EXT folder (this part is the same as on Windows) using the Install files option.
2. There is no option for a chart to use graphics using java.awt which is not available on Android. Instead, the Android Canvas class is provided. See the source of the example project for more details how to use it.
3. The Jar file has to be compiled to the Android’s DEX format. For more info see the example project.
The example
project contains 2 parts:
1. Eclipse project for Android with the ExternalElementExample. After loaded and compiled there are some additional steps required:
a. The project must be used to build and create files in bin folder, including externalelementexample.jar
b. Edit postbuild.bat file, and update 2 paths (one for Android tools folder and other for the bin folder)
c. Execute the postbuild.bat, it should create customexample.jar inside the bin folder (it should contain classes.dex file).
d. That customexample.jar file needs to be installed in BioEra EXT folder on Android. Usually it will be included in the same install.zip which is used to install designs, but put under EXT folder.
2. Install.zip file. It can be used to install the prebuilt jar of the project above. After that the default CustomElement element in an Android design (abd) should print the value on graphic chart. For more info see the source of the project above.
Note: The above install.zip file can be also downloaded directly from this location, which is the easiest way to try it. Just enter this URL on BioEra’s Install Files dialog: http://proatech.com/design/custom_element/install.zip , then load example design CustomElementExample.abd which was also installed.
Here is a list of what is NOT working the same as on Windows. Some of those options may be gradually improved.
· FlashPlayer element is NOT and will not be available.
· DVDPlayer element is NOT and will not be available.
· Vector3DDisplay is not available and may not be available any time soon.
· MIDI doesn’t work and may not be available any time soon.
· KeyboardSource and KeyboardAdvSource are not available, but one of them can be implemented.
· Menu options are limited or not available (e.g. MenuItemControl etc.), but they can be implemented.
· Some chart properties are not implemented. Pen properties are partially operational. Rendering hints are not available.
· Charts on separate Dialogs do NOT work and are not supported on Android (it makes no sense, since dialog must cover the main frame). Charts on separate Frames do work and are supported.
· Toolbar options may get better, but the Toolbar element is not and will not be available. Toolbars are very different on Android because they can be scrolled using touch. Currently only IconToolbarControl is available on Android.
Copyright © PROATECH LLC (http://www.proatech.com). All rights reserved.